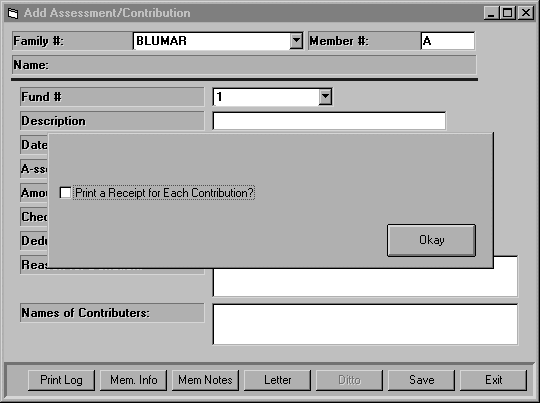
When you select this option the following screen will appear.

A dialog box will appear in the middle of the screen after you select this program. The dialog box will have a prompt asking you if you want to print receipts. If you do, click the box and click OK. Leave it blank and click OK if you do not want to print receipts with each contribution entered.
Enter the Family Code of the Member you want to add an assessment or Contribution for and press <ENTER>. Next enter the "Member Code" for the member you want to add an assessment or contribution for and press <ENTER>. If you are not sure what the Family Code and Member Code is, then click on the down arrow to the right of the "Family Code" field and a list of Members will appear displaying Family Code, Member Code, and Member Name. Select the Member that you want and the Member Code will be filled in automatically for you. The "Name" caption will contain the name of the Member whose code you've entered.
Next Enter the Fund Number. If you are not sure what the Fund Number is then click on the down arrow to the left of the "Fund Number" field and a list of Fund Numbers and descriptions will be displayed. Click on the Fund Number that you want and the Fund Number will be transposed to the Fund Number field for you. Press <ENTER> and the description will automatically be filled in for you. The Fund number that you enter must be a valid fund number, i.e. it must be a fund number that has been entered in the Configuration Program.
Enter the Date that the Assessment is affective or the Date that the Contribution was paid and press <ENTER>. If you are using US date format, then the date should be entered in MM/DD/YY format. Otherwise, enter the date in Canadian Format, YY/MM/DD.
If this is an Assessment Enter an "A" at the "Assessment/Contribution" field. If this is a contribution enter "R". If it is both an assessment and a Contribution, then enter a "C".
Enter the Dollar amount of the Assessment or Contribution and Press <ENTER>.
If this is a receipt, or if it is both an Assessment and a Contribution then you should enter the check number if applicable. Otherwise, leave the field blank and press <ENTER>.
If the transaction is a receipt, or if it is both an Assessment and a Contribution, then enter the Dollar Deductible amount for the Contribution and Press <ENTER>.
Letters
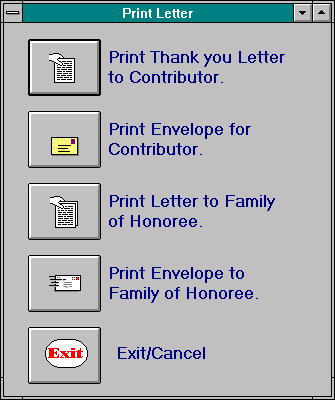
There is a button at the bottom of the screen labeled <Letter>. If you wish to print an acknowledgement letter to the Contributor, a "Memorial Letter", or envelopes, then click the <Letter> button and the following screen will appear.

When finished printing letters and envelopes, click the <Exit> button to return to the Assess/Contribution screen. If you're going to print letters or envelopes using this option you need to do so before saving the Transaction.
To save the Transaction, click on the <SAVE> button. The screen will be cleared except for the Family Code, Member Code, and the Date. These are left the same because when entering Transactions it is often common to have more than one transaction for the same member on the same date. If you want to add a transaction for a different member or for a different date simply click on the respective field and type over the old value. When you are finished entering Assessments and Contributions click the <Exit> button to return to the main menu.
Membership Information
There is a button at the button of the screen labeled <Mem Info>. If you wish to view the Membership information for a member click on this button and the "Membership" screen will be displayed. You'll notice from the Caption bar at the top of the "Membership" screen that your in update mode. If you do not have authority to update membership information, then you will be in browse mode. If you don't have authority to browse Membership information then you will not be allowed to see the Membership screen at all and clicking the <Display Membership Info> button will have no effect.