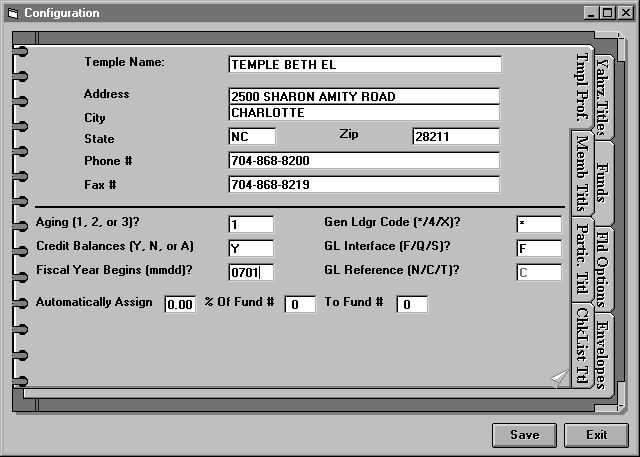
Select Configuration from the System sub-menu to enter your basic Temple information which will later appear on your statements. This screen also allows you to custom design your system to serve your temple's needs. Enter your temple's name and address in the space provided. Press [Enter] after each field to automatically move to the next field. Enter the phone and fax numbers.

The lower part of the screen has several options to select - see the following descriptions:
Aging:
This field allows you to set the time periods for your aging reports. The options available are 1, 2, and 3. Enter a "1" to print reports for aging periods of 30, 60, and 90 days. Enter a "2" to print reports for aging periods of 1, 2, and 3 years. Entering a "3" allows you to determine your aging periods at time of printing. (Aging reports are printed by using the Reports option at the top of the Main Menu. You can always overwrite your aging periods at print time but the option entered here will provide a default value.)
Credit Balances:
This field allows you to decide how credit balances are handled on your Aging Reports and Statements. A "Y" prints credit balances on aging reports and statements. It also causes the system to use a credit balance in one fund to offset an amount due in another fund when computing the total amount due. A "N" causes no credit balances to be printed on reports and no offsetting of other funds. An "A" will cause the system to print credit balances on reports but not to use a credit in one fund to offset a balance due in another fund.
Fiscal Year Begins:
Enter the month and date of your fiscal year begins.
General Ledger Code:
This code determines which of your transactions will be exported to the General Ledger. Entering an "*" in this field will cause your transactions to be posted to the General Ledger. Entering an "X" will prevent any transactions from being posted to the General Ledger, i.e. no active General Ledger is being used. A "4" will cause all transactions to be posted unless you are editing a transaction, in which case the change must be entered manually into the General Ledger. (Note: We recommend that whenever possible, rather than editing an existing transaction, a new transaction of either a negative assessment amount or negative receipt amount be entered instead.)
General Ledger Interface:
If you entered an "*" or a "4" in the field above, you must indicate which type of General Ledger you are using. Enter an "F" for Fogle Computing Accounting for Windows or DOS. Enter a "Q" for Quicken or Quickbooks and an "S" for Salamon Accounting.
General Ledger Reference:
If you are using QuickBooks, a reference is printed with each transaction. You can choose what you want to have printed with each transaction on the General Ledger reports. Enter an "N" for the Member's name. Enter a "C" for the Member's Family and Member Code. Enter a "T" if you only need to know that the transaction came from the TempleTracker accounts receivables.
Automatically Assign:
If you want to automatically assign 5% of Member Dues Fund to go directly into the Building Fund, you would set that up here.
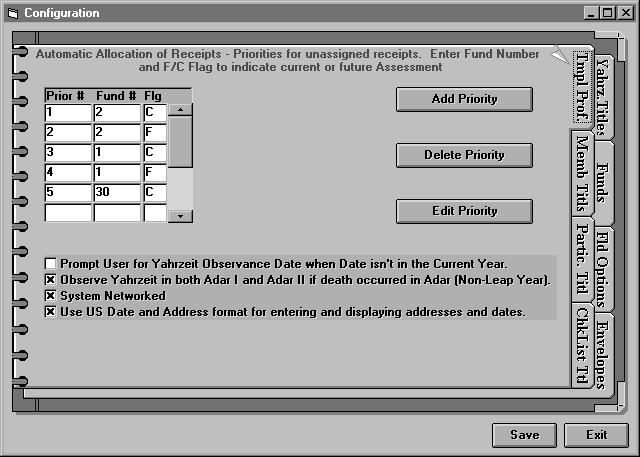
At the lower right hand corner of your screen, it looks like the page is beginning to turn. Click on that up-turned corner to turn the page to the next screen shown below:

Automatic Allocation of Receipts:
This section allows you to automatically allocate contributions to funds based on the priority level assigned to the funds here. You must use Add Receipt - Automatic Fund Allocation to use these priorities when entering checks. To add a priority, click <Add Priority> and type in the priority number (1,2,3 and so on), the corresponding fund number, then the Future/Current flag (F or C). For example, if you enter Priority 1, Fund 19, Flag C then Priority 2, Fund 12, Flag C - the system will apply the member's check first to everything he/she owes up until today in fund 19 and if the check covers that amount, the leftover funds will then be applied to everything owed until today in fund 12 and so on.
Prompt User for Yahrzeit Observance Date when Date isn't in the Current Year:
This field allows you to decide if you want the system to automatically assign an observance date or ask the user to enter the observance date manually if the Hebrew Date of Death is not in the current Hebrew Year. For example, if the Hebrew Date of Death is Tevet 30 and there is not a Tevet 30 in the current Hebrew year, the system will automatically assign the next day, Shevat 1, as the date of observance. However, if you have checked this box, the system will prompt you to enter a date if, for example, you are trying to print a report with Date of Observance but the Date of Observance is invalid for the current year.
Observe Yahrzeit in both Adar I and Adar II if death occurred in Adar (Non-Leap Year):
Checking this box causes the system to assign two dates of observance if the death occurred in Adar in a Non-Leap Year but the current year is a Leap Year. One notice will print in Adar I and the next in Adar II.
System Networked:
Be sure to uncheck this box if yours is a stand alone system and check it if your system is networked.
Use US Date and Address format for entering and displaying addresses and dates:
Checking this box will cause dates to be displayed in MM/DD/YYYY format. Leaving it blank will cause dates to be displayed in YYYY/MM/DD format.